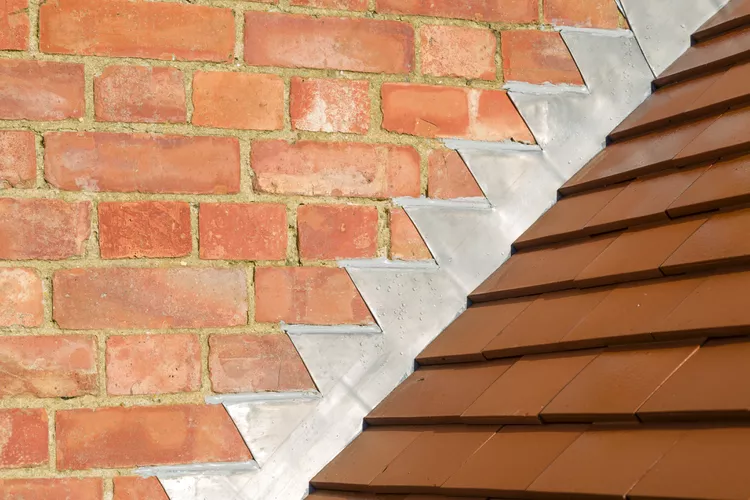
An effective system of step flashing on a roof is crucial to maintaining not just your roof but your entire home. Mold, rot, insects, and structural failure are the main byproducts of moisture intrusion inside walls, attics, roofs, and floors. Learn how to install step flashing to keep your house dry and in good condition.

Basics of Installing Step Flashing on a Roof
Flashing is a solid, waterproof material that prevents water from entering seams or joints in a building. Step flashing is a flashing variation that builds upward along the roof pitch, using small pieces of flashing that are interwoven with the shingles. Step flashing is usually some type of metal; aluminum and copper are popular, but stainless steel and lead are used, as well.
With roofing systems, any kind of joint or seam is an invitation for potential water leakage. Where the roof meets a wall or other upper vertical surface such as for a dormer, the problem is pronounced. Water coursing off of the wall collects in the 90-degree intersection between the wall and the roof. When snow banks up in that area, subsequent snowmelt can linger and eventually seep between the wall and the roof.
Sealing the shingles to the wall with tar, caulk, or other liquid products is a fix that rarely lasts long. Eventually, these types of sealants fail, permitting water into the home. L-shaped step flashing is flexible enough to move with the home as it expands and contracts yet it is solid enough to hold back water.
Codes, Regulations, and Permits
Most communities will not require a building permit before installing step flashing on a roof as a repair project. If the flashing is being installed while roofing or re-roofing the home, your community may require a building permit for the roofing job.
When to Install Step Flashing
Step flashing is installed when roofing shingles are installed. If the shingles are already in place, some shingles must be removed to allow installation of the step flashing. Consequently, install step flashing only in dry conditions.
Safety Considerations
Installing step flashing requires you to work on the roof. Guard against falls by wearing a fall arrest system and by working with a partner.
What You’ll Need
Equipment / Tools
- Tin snips
- Ladder
- Hammer
Materials
- Pre-formed step flashing
- Roofing nails
Instructions
Remove Sections of the Siding
Remove the lower sections of siding on the wall. Since step flashing commonly extends 8 inches high on the wall, remove the lower 10 to 12 inches of siding to provide yourself with ample working room.
Nail the First Row of Shingles
With the hammer and the roofing nails, nail down the first course of shingles. Always shingle from the bottom upward for shingles to lay properly. This first row of shingles slightly overhangs the edge of the roof.
Position the First Step Flashing Piece
The first step flashing will extend from the roof to the wall. Position the step flashing piece horizontally so that it matches the position of the shingle below it.
Nail the Step Flashing Piece
Nail the step flashing into the wall with two nails. The nails should be about 1-inch below the top of the flashing.
Nail the Second Row of Shingles
Nail down the second row of shingles farther upward, overlapping the first row of shingles and the flashing.
Position and Nail the Second Step Flashing Piece
Position the second flashing piece over the second row of shingles, so that its left side matches up with the left side of the second shingle row. It should also cover up the nails holding down the shingle. Nail the step flashing in place on the wall with two nails.
Continue the Flashing to Completion
Continue weaving the step flashing pieces and the shingles in the manner already described until you reach the highest point of the wall on the roof pitch. A final row of shingles should complete the job; no full step flashing pieces should be exposed.
Replace the Siding
With the step flashing in place, replace the siding on the wall. Maintain about 1/2-inch between the top of the shingle/flashing and the bottom of the siding.
When to Call a Professional
Roofing companies and fix-it services can install or repair step flashing for you on a piecemeal basis—that is, short of a full roofing job. For installing step flashing on chimneys, call a masonry company or chimney specialist since the step flashing typically is mortared between the bricks.

I appreciate the emphasis on using quality materials. It’s a reminder that investing in good materials now can prevent issues down the line.
I love the before-and-after pictures. It’s inspiring to see the impact of proper step flashing installation on the overall integrity of the roof.
The mention of common mistakes to avoid is helpful.
Learning about step flashing installation feels like a practical skill upgrade, boosting my confidence to tackle roofing projects with greater precision and efficiency.
Step flashing installation seems daunting at first, but with clear instructions and guidance, I’m encouraged to take on the challenge and ensure a watertight seal for my roof.
Appreciating the step-by-step guide for installing flashing, it provides valuable insights into proper roofing techniques, enhancing my understanding of home maintenance and repair tasks.
Installing step flashing on your roof is crucial for preventing leaks around roof penetrations like chimneys and dormers, ensuring long-lasting protection against water damage.